
Recipes Inspired by My Travels: A Culinary Journey Around the World
Hello, dear friends!
I’m absolutely thrilled that you’ve stopped by to share in my passion for travel and food. Over the years, my journeys have taken me to enchanting corners of the globe, and with every new destination, I discovered flavors that not only tantalized my taste buds but also inspired me to create dishes in my own kitchen. In this post, I’m sharing a collection of recipes that are deeply intertwined with my travel memories—a tribute to the wonderful places and the kind, welcoming people I met along the way.
Every recipe in this post is more than just a set of ingredients and instructions. They’re stories on a plate, each carrying a memory, a cultural experience, or a lesson in the art of living joyfully. I hope that as you read through these recipes, you’ll feel the warmth of the sun-drenched Italian countryside, the rustic charm of a French village, the vibrant energy of a Thai market, the colorful zest of Mexican street food, and the sweet comfort of a Spanish evening. So, grab a cup of your favorite beverage, get cozy, and join me on this culinary journey that spans continents and celebrates the universal language of food.
1. The Italian Experience: A Journey to Pasta Perfection
There’s something truly magical about Italy—its winding cobblestone streets, quaint trattorias, and the aroma of fresh basil and garlic wafting through the air. I still remember the first time I sat at a small family-run osteria in a sleepy village in Tuscany. The owner, with a generous heart and a knowing smile, served me a bowl of pasta that was so simple, yet so sublime. The pasta was coated in a vibrant, sun-kissed tomato sauce made from plump, locally grown tomatoes, fragrant basil, and just the right touch of garlic. That meal didn’t just fill my stomach; it filled my soul with warmth and reminded me that sometimes the simplest ingredients can create the most memorable experiences.
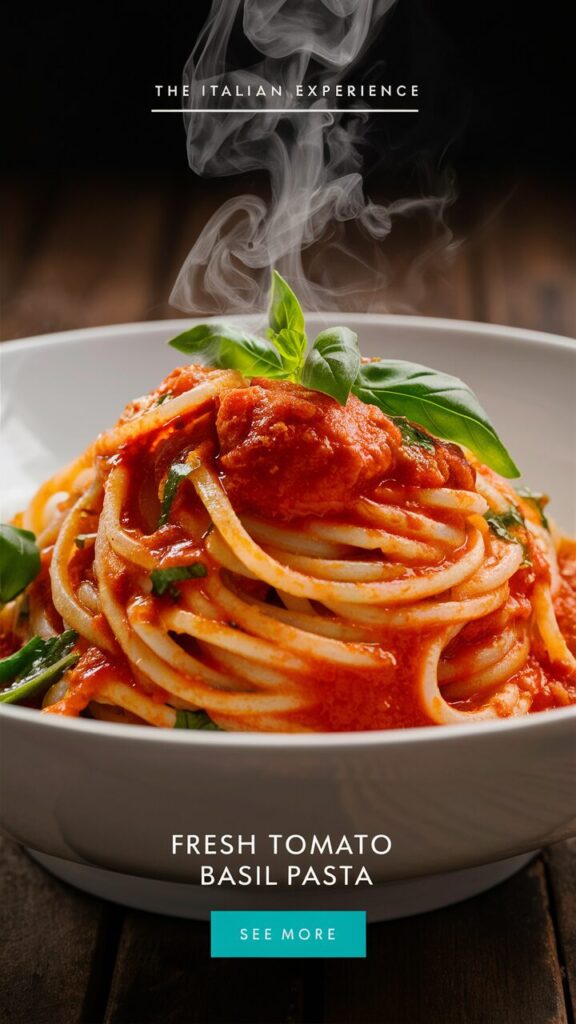
The Recipe: Fresh Tomato Basil Pasta
Ingredients:
- For the Pasta:
- 400g (14 oz) of your favorite pasta (spaghetti, linguine, or penne work beautifully)
- 1 tablespoon salt (for the pasta water)
- For the Tomato Basil Sauce:
- 2 tablespoons extra virgin olive oil
- 4 cloves garlic, thinly sliced
- 1 medium yellow onion, finely chopped
- 1/2 teaspoon red pepper flakes (optional for a little heat)
- 800g (28 oz) of ripe tomatoes (or two 14 oz cans of whole peeled tomatoes, crushed by hand)
- A pinch of sugar (to balance the acidity)
- Salt and freshly ground black pepper, to taste
- A large handful of fresh basil leaves, torn into pieces
- 1 teaspoon dried oregano (optional)
- Freshly grated Parmesan cheese (for serving)
Instructions:
- Prepare the Pasta:
Begin by bringing a large pot of water to a rolling boil. Add a generous tablespoon of salt (this is your chance to season the pasta from the inside out) and then the pasta. Cook according to the package instructions until al dente. When done, reserve about a cup of the pasta water and then drain the pasta. Set aside. - Make the Sauce:
While the pasta is cooking, heat the extra virgin olive oil in a large, deep skillet over medium heat. Add the thinly sliced garlic and chopped onions. Sauté gently until the onions are translucent and the garlic is fragrant—this should take about 3-4 minutes. Be careful not to let the garlic brown too much, as it can become bitter. - Add the Tomatoes:
If you’re using fresh tomatoes, blanch them briefly in boiling water, peel off the skins, and roughly chop them. Add the tomatoes (or the hand-crushed canned tomatoes) to the skillet. Stir in the red pepper flakes and a pinch of sugar. Allow the sauce to simmer gently for about 15-20 minutes, stirring occasionally. The sauce should thicken slightly as the flavors meld together. - Season and Finish:
Once your sauce has developed a rich, deep flavor, season it generously with salt and freshly ground black pepper. Stir in the torn basil leaves (and oregano, if using) towards the end of the cooking time to preserve their vibrant aroma. If the sauce seems too thick, add a little of the reserved pasta water to achieve your desired consistency. - Combine Pasta and Sauce:
Add the drained pasta directly into the skillet with your tomato basil sauce. Toss well so that every strand or piece of pasta is lovingly coated with the sauce. Allow the pasta to sit in the sauce for a minute or two, absorbing all those wonderful flavors. - Serve:
Serve your Fresh Tomato Basil Pasta hot, with a generous sprinkle of freshly grated Parmesan cheese and an extra drizzle of olive oil if desired. Pair with a crisp green salad and a glass of Italian red wine for a truly authentic experience.
A Little Story:
Every time I make this dish, I’m transported back to that Tuscan village where time seemed to slow down, and every meal was an opportunity to savor life. The simplicity of the ingredients mirrors the beauty of everyday moments—simple yet profoundly fulfilling. Whether it’s a sunny afternoon in Italy or a cozy evening at home, this pasta is my ode to all the hidden gems I discovered on my travels.
2. A Taste of France: Rustic Ratatouille
France has always held a special place in my heart. I remember wandering through the narrow lanes of Provence, where the air was filled with the scents of lavender, fresh herbs, and the earthy aroma of the countryside. One particular evening, I joined a local family for dinner in a charming village café. The star of the meal was a dish called ratatouille—a hearty, rustic vegetable stew that showcased the best of summer’s bounty. This dish, brimming with flavors and memories, is one I now love to prepare as a reminder of that unforgettable French summer.

The Recipe: Rustic Provençal Ratatouille
Ingredients:
- Vegetables:
- 1 large eggplant, cut into 1-inch cubes
- 2 medium zucchinis, sliced into rounds
- 1 red bell pepper, seeded and chopped
- 1 yellow bell pepper, seeded and chopped
- 1 green bell pepper, seeded and chopped
- 1 large onion, coarsely chopped
- 4 cloves garlic, minced
- For the Sauce:
- 4 ripe tomatoes, chopped (or 1 can of diced tomatoes, 14 oz)
- 3 tablespoons extra virgin olive oil
- 1 teaspoon dried thyme
- 1 teaspoon dried rosemary
- 1 bay leaf
- Salt and freshly ground black pepper, to taste
- 1 teaspoon sugar (optional, to balance acidity)
- A handful of fresh basil, roughly torn
- To Finish:
- Fresh parsley, chopped (for garnish)
- A drizzle of extra olive oil for serving
Instructions:
- Preheat and Prepare:
Preheat your oven to 375°F (190°C). In a large mixing bowl, toss the eggplant cubes with a little salt and a drizzle of olive oil. Spread them out on a baking sheet in a single layer. Roast for about 20-25 minutes until they begin to soften and develop a slight char. This roasting step intensifies the natural flavors of the eggplant, lending a smoky note to your ratatouille. - Sauté the Base:
While the eggplant is roasting, heat the 3 tablespoons of olive oil in a large, heavy-bottomed pot over medium heat. Add the chopped onions and garlic, and sauté until the onions become soft and translucent—about 5 minutes. The slow cooking of these aromatics is key to developing the base flavor of the stew. - Add the Vegetables:
Once your onions and garlic are perfectly softened, add the bell peppers and zucchinis to the pot. Sauté for another 5-7 minutes until the vegetables begin to soften but still retain some texture. At this point, add in the chopped tomatoes, dried thyme, rosemary, bay leaf, and a pinch of salt and pepper. If your tomatoes are a bit too tart, sprinkle in the optional teaspoon of sugar. - Combine and Simmer:
Carefully fold in the roasted eggplant into the mixture. Lower the heat and allow everything to simmer gently for about 25-30 minutes. Stir occasionally to ensure that all the vegetables meld together into a harmonious blend of flavors. The result should be a vibrant, chunky stew that smells as good as it tastes. - Final Touches:
Just before serving, stir in the fresh basil and adjust the seasoning if necessary. Remove the bay leaf. The freshness of the basil brightens the dish, giving it an unmistakably Provencal finish. - To Serve:
Ladle your Rustic Provençal Ratatouille into deep bowls. Garnish with chopped fresh parsley and a light drizzle of extra virgin olive oil. This dish is perfect served with a crusty baguette, a side of creamy polenta, or even as a hearty topping for a baked potato.
A Little Story:
I still recall that cool evening in Provence—the setting sun casting a golden glow over the vineyards, the gentle hum of conversation in the background, and the undeniable sense of community that food brings. Ratatouille is not just a dish; it’s a celebration of the season’s freshest vegetables and the art of slow, mindful cooking. Every spoonful takes me back to that charming village, where every meal was a moment of connection and simple pleasures.
3. Exotic Flavors of Thailand: A Soul-Warming Green Curry
Thailand’s vibrant street markets and bustling night bazaars introduced me to an entirely new palette of flavors. It was in Bangkok, amidst the spicy aromas and the lively chatter of vendors, that I discovered Thai green curry—a dish that bursts with freshness, heat, and an unforgettable balance of sweet, salty, and spicy notes. This recipe is my take on that classic, modified just enough to bring a personal twist while staying true to its soul-warming roots.

The Recipe: Thai Green Curry with Chicken and Vegetables
Ingredients:
- For the Curry Paste:
- 4 green chilies (seeded for less heat, if desired)
- 2 shallots, roughly chopped
- 4 cloves garlic
- 1-inch piece of galangal (or ginger as a substitute)
- 1 stalk lemongrass, tender part only, finely sliced
- 1 teaspoon ground coriander
- 1 teaspoon ground cumin
- Zest of 1 lime
- A small bunch of fresh cilantro (stems and leaves)
- 1 tablespoon fish sauce (or soy sauce for a milder version)
- 1 tablespoon extra virgin olive oil
- For the Curry:
- 1 tablespoon vegetable oil
- 500g (1 lb) chicken thighs or breasts, cut into bite-sized pieces (feel free to substitute tofu or your favorite protein)
- 1 medium eggplant, cubed (Thai eggplant or regular eggplant)
- 1 red bell pepper, sliced into strips
- 1 cup green beans, trimmed and cut into 2-inch pieces
- 400ml (about 1 2/3 cups) coconut milk (full-fat for extra creaminess)
- 1 cup chicken broth (or vegetable broth)
- 1 tablespoon palm sugar (or brown sugar)
- Juice of 1 lime
- A handful of fresh basil (Thai basil if available) for garnish
- Extra fish sauce and lime wedges, for serving
Instructions:
- Prepare the Curry Paste:
In a blender or food processor, combine the green chilies, shallots, garlic, galangal, lemongrass, ground coriander, ground cumin, lime zest, fresh cilantro, fish sauce, and olive oil. Blend until you achieve a smooth paste. This paste is the heart of the curry, so take your time to ensure every ingredient is well incorporated. - Brown the Chicken:
Heat the vegetable oil in a large, deep pan or wok over medium-high heat. Add the chicken pieces and sauté until they are lightly browned on all sides. The browning process adds depth to the flavors. Once the chicken is browned, remove it from the pan and set it aside. - Build the Curry:
In the same pan, add your freshly made curry paste. Fry the paste gently for 2-3 minutes over medium heat. This allows the spices to bloom, releasing their essential oils and intensifying the flavor of your dish. - Add the Liquids and Vegetables:
Pour in the coconut milk and chicken broth, stirring well to combine with the curry paste. Bring the mixture to a gentle simmer. Return the browned chicken to the pan, then add the eggplant, red bell pepper, and green beans. Allow everything to simmer together for about 15-20 minutes, until the chicken is cooked through and the vegetables are tender but still retain a slight crunch. - Season and Finish:
Stir in the palm sugar, and adjust the seasoning with additional fish sauce if needed. Squeeze in the lime juice to brighten up the flavors. Taste your curry and tweak the balance of sweet, salty, and tangy according to your preference. - To Serve:
Ladle your Thai Green Curry into bowls, and garnish with fresh basil leaves. Serve the curry hot, accompanied by steamed jasmine rice or sticky rice to soak up all the delicious, creamy sauce. A wedge of lime on the side is always a welcome addition for that extra burst of citrus.
A Little Story:
I remember my first encounter with Thai green curry on a rainy evening in Bangkok. The busy city was abuzz with energy, yet inside a tiny roadside eatery, I found solace in the comforting warmth of a bowl of curry. The balance of spices, the creaminess of the coconut milk, and the freshness of the herbs created a symphony of flavors that perfectly mirrored the dynamic spirit of Thailand. Every time I prepare this dish at home, I’m reminded of that vibrant street market, the sounds of sizzling woks, and the friendly smiles of the locals.
4. Spicy Streets of Mexico: Tacos al Pastor with a Twist
Mexico has an energy that is impossible to ignore—from the lively street festivals to the spirited music and, of course, the unforgettable food. One of the highlights of my travels was exploring the colorful streets of Mexico City, where I discovered the magic of Tacos al Pastor. Traditionally made with marinated pork, these tacos are a celebration of spices, tang, and a touch of sweetness. In this recipe, I’ve added my own twist to capture the essence of that unforgettable experience while keeping the preparation accessible for your home kitchen.

The Recipe: Tacos al Pastor with a Personal Twist
Ingredients:
- For the Marinade:
- 1kg (2.2 lbs) pork shoulder, thinly sliced into bite-sized pieces
- 4 dried guajillo chilies (rehydrated in warm water)
- 2 dried ancho chilies (rehydrated in warm water)
- 3 cloves garlic
- 1 small onion, chopped
- 1/4 cup orange juice
- 1/4 cup pineapple juice (plus extra pineapple slices for garnish)
- 2 tablespoons apple cider vinegar
- 1 teaspoon ground cumin
- 1 teaspoon dried oregano
- Salt and pepper, to taste
- For the Tacos:
- Small corn tortillas (preferably warmed on a comal or skillet)
- Fresh cilantro, roughly chopped
- Finely diced white onion
- Lime wedges
- Sliced radishes (optional, for a fresh crunch)
- Sliced pineapple (grilled or fresh, for garnish)
Instructions:
- Prepare the Marinade:
In a blender, combine the rehydrated guajillo and ancho chilies, garlic, onion, orange juice, pineapple juice, apple cider vinegar, cumin, oregano, and a pinch of salt and pepper. Blend until the mixture is completely smooth. This vibrant marinade is the soul of the dish, infusing the pork with layers of tangy, spicy, and sweet flavors. - Marinate the Pork:
Place the thinly sliced pork shoulder in a large bowl or a resealable plastic bag. Pour the marinade over the meat, ensuring every piece is well coated. Cover the bowl or seal the bag, and let the pork marinate in the refrigerator for at least 4 hours—ideally overnight. The longer the meat marinates, the deeper the flavors will penetrate. - Cooking the Pork:
When you’re ready to cook, preheat a large skillet or grill pan over medium-high heat. Add the marinated pork slices in batches (to avoid overcrowding) and cook for about 3-4 minutes per side, until the meat is charred around the edges and cooked through. If you have extra pineapple slices, grill them alongside the pork until caramelized. - Assemble the Tacos:
Warm your corn tortillas either on a skillet or directly over a gas flame for a few seconds on each side. This step not only softens the tortillas but also gives them a slight smoky char. Place a generous portion of the cooked pork onto each tortilla, then top with freshly diced white onion, chopped cilantro, and a few pieces of grilled pineapple. - Final Touches:
Serve your Tacos al Pastor with lime wedges on the side, so everyone can add a squeeze of citrus to brighten the flavors. If you like a bit of extra crunch, scatter some thinly sliced radishes over the tacos. The mix of textures—from the tender, spiced pork to the crisp vegetables and juicy pineapple—creates a delightful eating experience.
A Little Story:
My first bite of Tacos al Pastor in Mexico City was a revelation. I was wandering through a busy market when the irresistible aroma of marinated pork cooking on a spit drew me in. The vendor’s infectious smile and the lively chatter of locals made the experience even more special. Every bite was a reminder of the passion and creativity found in Mexican street food. This recipe is my homage to that magical day—a celebration of bold flavors, vibrant colors, and the joy of sharing great food with even greater company.
5. A Sweet Farewell: Spanish Churros with Rich Chocolate Sauce
No culinary journey is complete without a sweet ending, and for me, nothing evokes the spirit of celebration quite like Spanish churros dipped in luscious chocolate sauce. I first encountered churros during a festive evening in Seville. The rhythmic sizzle as the dough hit the hot oil, the heavenly aroma, and the joyful faces of locals savoring these treats remain etched in my memory. Today, I’m delighted to share this recipe with you—a warm, comforting dessert that’s perfect for gatherings, family moments, or simply indulging in a little self-care.

The Recipe: Classic Spanish Churros with Chocolate Dipping Sauce
Ingredients:
- For the Churros:
- 1 cup water
- 2 tablespoons granulated sugar
- 1/2 teaspoon salt
- 2 tablespoons vegetable oil
- 1 cup all-purpose flour
- Extra vegetable oil for deep-frying
- 1/2 cup granulated sugar (for dusting)
- 1 teaspoon ground cinnamon (for dusting)
- For the Chocolate Sauce:
- 200g (about 7 oz) dark chocolate (70% cocoa or higher), chopped
- 1 cup heavy cream
- 2 tablespoons granulated sugar
- 1/2 teaspoon vanilla extract
- A pinch of salt
Instructions:
- Prepare the Dough:
In a medium saucepan, combine the water, 2 tablespoons of sugar, salt, and 2 tablespoons of vegetable oil. Bring this mixture to a boil over medium heat. Once boiling, remove from heat and immediately stir in the flour. Mix vigorously until the dough forms a ball and is smooth. Allow it to cool for about 5 minutes. - Heat the Oil:
In a deep pot or a deep fryer, heat about 2 inches of vegetable oil to 375°F (190°C). It’s important that the oil is hot enough so that the churros fry quickly and become wonderfully crisp on the outside while remaining soft inside. - Pipe the Churros:
Spoon the dough into a pastry bag fitted with a large star tip. Carefully pipe strips of dough directly into the hot oil, cutting them to your desired length (usually about 4-6 inches). Fry a few at a time to avoid overcrowding the pan. Fry until golden brown, turning them as needed to ensure an even crispness—usually about 2-3 minutes per batch. - Drain and Dust:
Using a slotted spoon, remove the churros from the oil and place them on a plate lined with paper towels to drain the excess oil. While still warm, toss the churros in a mixture of 1/2 cup sugar and 1 teaspoon cinnamon until evenly coated. - Make the Chocolate Sauce:
In a small saucepan over medium heat, bring the heavy cream and granulated sugar to a simmer. Once simmering, remove from the heat and add the chopped dark chocolate. Stir continuously until the chocolate is completely melted and the sauce is smooth. Stir in the vanilla extract and a pinch of salt. If the sauce is too thick, you can add a little more cream until you reach your desired consistency. - To Serve:
Serve your churros warm, arranged on a plate with a small bowl of rich, velvety chocolate sauce for dipping. These churros are best enjoyed fresh, with friends and family gathered around, sharing stories and sweet moments.
A Little Story:
That festive night in Seville still brings a smile to my face. The churro vendor, a kindly old man with twinkling eyes, explained how his recipe had been passed down through generations. As I dipped a crisp churro into the warm chocolate, I felt an overwhelming sense of connection—to the culture, to the people, and to the universal joy of sweet treats shared with loved ones. This recipe is my way of bringing that magic back home, inviting you to create your own sweet memories with every bite.
Travel has a unique way of transforming the ordinary into something extraordinary. Through these recipes, I’ve attempted to capture a fraction of the magic I experienced on my journeys. From the simple yet soulful pasta in Italy to the rustic ratatouille in France, the exotic vibrancy of Thai green curry, the spirited energy of Mexican tacos, and the heartwarming delight of Spanish churros—each dish is a chapter in my travel diary, a moment in time that I now get to share with you.
I hope that these recipes inspire you to embark on your own culinary adventures. Whether you’re a seasoned traveler or someone who finds joy in exploring new tastes in your own kitchen, remember that every meal has a story waiting to be told. Experiment with flavors, share your creations with friends and family, and most importantly, savor every bite.
Thank you for joining me on this flavorful journey. I would love to hear your stories, your modifications, and your own travel-inspired recipes. Feel free to leave a comment, share your experiences on social media, or even send me a message with your favorite culinary memory. Together, let’s continue to explore, create, and celebrate the incredible diversity of food that connects us all.